CRUD Operations In Angular 7 Using Web API
- Get link
- X
- Other Apps
CRUD Operations In Angular 7 Using Web API
In this step by step tutorial, I'm going to perform CRUD operations in an Angular 7 Web application. The backend is a SQL Server databse. A Web API is used to provide data connectivity between the database and the front end application. On the UI side, I will use Angular Material theme to create a rich, interactive and device-independent user experience.
I'm using Visual Studio Code as a tool to build my application. If you don't have Visual studio code in your system then first you have to download and install. Here is Visual Studio Code download link: Download Visual Studio Code Editor
Step 1. Create a database table
Create a database. Open SQL Server and create a new database table. As you can see from the following image, I create a database table called EmployeeDetails with 7 columns.

Note: If you already have an exisitng database and table, you can skip this step.
Step 2. Create a Web API Project
Now, we will create a Web API with the functionaity of Create, Replace, Update and Delete (CRUD) operations.
Now, we will create a Web API with the functionaity of Create, Replace, Update and Delete (CRUD) operations.
Open Visual Studio >> File >> New >> Poject >> Select Web Application. After that click OK and you will see the templates. Select Web API template.
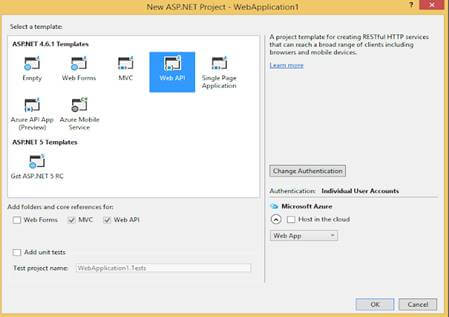
Click OK.
Step 3. Add ADO.NET Entity Data Model
Now, Select Models folder >> Right click >>Add >> New Item >> select Data in left panel >>ADO.NET Entity Data Model,
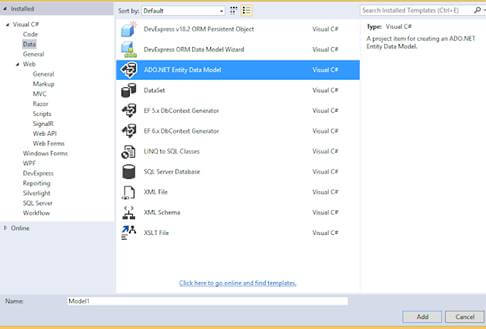
Now click Add button then select EF Designer from database >> Next >> After that give your SQL credential and select the database where your database table and data is.
Click Add button and select your table and click on Finish button.
Step 4. CRUD Operations
Step 4. CRUD Operations
Now, we will write code to perform CRUD operation.
Go to the Controller folder in our API Application and right click >> Add >> Controller >> Select Web API 2 Controller-Empty
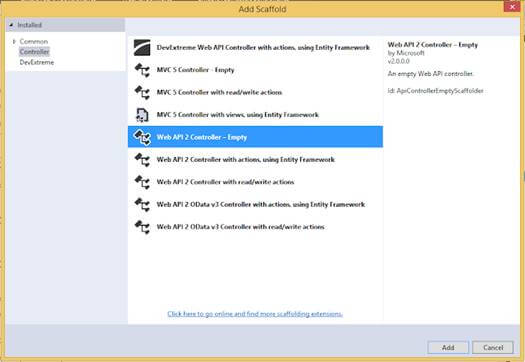
Now, we will go to controller class and set the routing to make it more user friendly by writing the below code.
- using System;
- using System.Linq;
- using System.Web.Http;
- using CRUDAPI.Models;
- namespace CRUDAPI.Controllers
- {
- [RoutePrefix("Api/Employee")]
- public class EmployeeAPIController : ApiController
- {
- WebApiDbEntities objEntity = new WebApiDbEntities();
- [HttpGet]
- [Route("AllEmployeeDetails")]
- public IQueryable<EmployeeDetail> GetEmaployee()
- {
- try
- {
- return objEntity.EmployeeDetails;
- }
- catch(Exception)
- {
- throw;
- }
- }
- [HttpGet]
- [Route("GetEmployeeDetailsById/{employeeId}")]
- public IHttpActionResult GetEmaployeeById(string employeeId)
- {
- EmployeeDetail objEmp = new EmployeeDetail();
- int ID = Convert.ToInt32(employeeId);
- try
- {
- objEmp = objEntity.EmployeeDetails.Find(ID);
- if (objEmp == null)
- {
- return NotFound();
- }
- }
- catch (Exception)
- {
- throw;
- }
- return Ok(objEmp);
- }
- [HttpPost]
- [Route("InsertEmployeeDetails")]
- public IHttpActionResult PostEmaployee(EmployeeDetail data)
- {
- if (!ModelState.IsValid)
- {
- return BadRequest(ModelState);
- }
- try
- {
- objEntity.EmployeeDetails.Add(data);
- objEntity.SaveChanges();
- }
- catch(Exception)
- {
- throw;
- }
- return Ok(data);
- }
- [HttpPut]
- [Route("UpdateEmployeeDetails")]
- public IHttpActionResult PutEmaployeeMaster(EmployeeDetail employee)
- {
- if (!ModelState.IsValid)
- {
- return BadRequest(ModelState);
- }
- try
- {
- EmployeeDetail objEmp = new EmployeeDetail();
- objEmp = objEntity.EmployeeDetails.Find(employee.EmpId);
- if (objEmp != null)
- {
- objEmp.EmpName = employee.EmpName;
- objEmp.Address = employee.Address;
- objEmp.EmailId = employee.EmailId;
- objEmp.DateOfBirth = employee.DateOfBirth;
- objEmp.Gender = employee.Gender;
- objEmp.PinCode = employee.PinCode;
- }
- int i = this.objEntity.SaveChanges();
- }
- catch(Exception)
- {
- throw;
- }
- return Ok(employee);
- }
- [HttpDelete]
- [Route("DeleteEmployeeDetails")]
- public IHttpActionResult DeleteEmaployeeDelete(int id)
- {
- //int empId = Convert.ToInt32(id);
- EmployeeDetail emaployee = objEntity.EmployeeDetails.Find(id);
- if (emaployee == null)
- {
- return NotFound();
- }
- objEntity.EmployeeDetails.Remove(emaployee);
- objEntity.SaveChanges();
- return Ok(emaployee);
- }
- }
- }
As you may see from the above code, it has functionality to add, replace, update, and delete records to the table.
Step 5. Build UI Application
Now, we create the Web application in Angular 7 that will consume Web API.
Now, we create the Web application in Angular 7 that will consume Web API.
First we have to make sure that we have Angular CLI installed.
Open command prompt and type below code and press ENTER:
npm install -g @angular/cli
Now, open Visual Studio Code and create a project.
Open TERMINAL in Visual Studio Code and type the following syntax to create a new project. We name it Angularcrud.
ng new Angularcrud
After that, hit ENTER. It will take a while to create the project.
Once created, the project should loook like this.
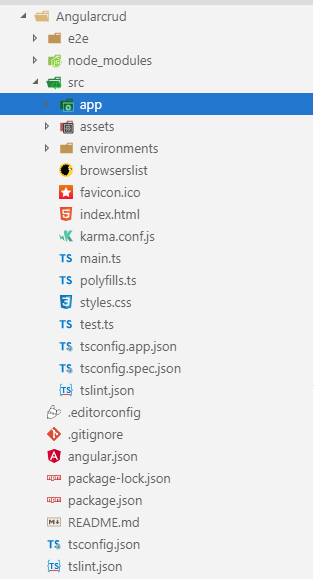
Now, we can create some components to provide the UI.
I'm going to create a new component, Employee.
Go to the TERMINAL and go our angular project location using the following command:
cd projectName

Now, write the following command that will create a component.
ng g c employee
Press ENTER.
Note: you can use see the component is created.
Press ENTER.
Note: you can use see the component is created.
Step 6. Create a Service
Now, we will create a service.
Open the TERMINAL and write the below command:
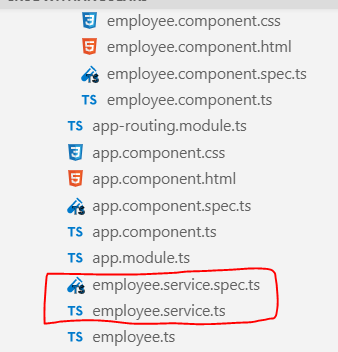
ng g s employee
Press ENTER and you will see two service files.
Now, we will create a service.
Open the TERMINAL and write the below command:
ng g s employee
Press ENTER and you will see two service files.
Now, we create a class like model class.
Open TERMINAL and write the below command:
ng g class employee
Now, write all properties of the Employee class related to an employee that matches with the database.
Now, write all properties of the Employee class related to an employee that matches with the database.
- export class Employee {
- EmpId: string;
- EmpName: string;
- DateOfBirth: Date;
- EmailId: string;
- Gender: string;
- Address: string;
- PinCode: string;
- }
Now, open employee.service.ts and first import necessary class and libraries and then make calls to the WebAPI methods.
- import { Injectable } from '@angular/core';
- import { HttpClient } from '@angular/common/http';
- import { HttpHeaders } from '@angular/common/http';
- import { Observable } from 'rxjs';
- import { Employee } from './employee';
- After that we write all methods related to consume web in employee.service.ts
- @Injectable({
- providedIn: 'root'
- })
- export class EmployeeService {
- url = 'http://localhost:65389/Api/Employee';
- constructor(private http: HttpClient) { }
- getAllEmployee(): Observable<Employee[]> {
- return this.http.get<Employee[]>(this.url + '/AllEmployeeDetails');
- }
- getEmployeeById(employeeId: string): Observable<Employee> {
- return this.http.get<Employee>(this.url + '/GetEmployeeDetailsById/' + employeeId);
- }
- createEmployee(employee: Employee): Observable<Employee> {
- const httpOptions = { headers: new HttpHeaders({ 'Content-Type': 'application/json'}) };
- return this.http.post<Employee>(this.url + '/InsertEmployeeDetails/',
- employee, httpOptions);
- }
- updateEmployee(employee: Employee): Observable<Employee> {
- const httpOptions = { headers: new HttpHeaders({ 'Content-Type': 'application/json'}) };
- return this.http.put<Employee>(this.url + '/UpdateEmployeeDetails/',
- employee, httpOptions);
- }
- deleteEmployeeById(employeeid: string): Observable<number> {
- const httpOptions = { headers: new HttpHeaders({ 'Content-Type': 'application/json'}) };
- return this.http.delete<number>(this.url + '/DeleteEmployeeDetails?id=' +employeeid,
- httpOptions);
- }
- }
Our service is completed now.
If you consume the Web API, Angular blocks the URL and we called this issue CORS(Cross OriginResource Sharing).
First, let's resolve this problem.
Go to the Web API project.
Download a Nuget package for CORS. Go to NuGet Package Manager and download the following file.

After that, go to App_Start folder in Web API project and open WebApiConfig.cs class. Here, modify the Register method with the below code.
- Add namespace
- using System.Web.Http.Cors;
- var cors = new EnableCorsAttribute("*","*","*");//origins,headers,methods
- config.EnableCors(cors);
Step 7. Install and Configure Angular Material Theme
As I said earlier, we will use Angular Material theme to create a rich, interactive and device-oriented UI for our Web app.
As I said earlier, we will use Angular Material theme to create a rich, interactive and device-oriented UI for our Web app.
Let's install Install Angular Material theme.
Open TERMINAL again and write the below command:
npm install --save @angular/material @angular/cdk @angular/animations
If you want learn more about Angular Material, visit here: link.
After installed successfully, we can check in package.json file.
After installed successfully, we can check in package.json file.
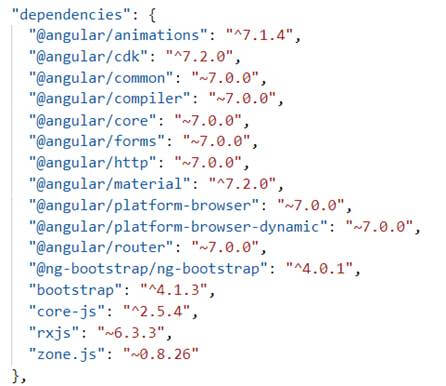
Now, let's all required libraries in app.module.ts. We also import a date picker because we'll use the date picker for date of birth field.
Now, open app.module.ts class and write the below code.
- import { BrowserModule } from '@angular/platform-browser';
- import { NgModule } from '@angular/core';
- import { EmployeeService } from './employee.service';
- import { FormsModule, ReactiveFormsModule } from '@angular/forms';
- import { HttpClientModule, HttpClient } from '@angular/common/http';
- import {
- MatButtonModule, MatMenuModule, MatDatepickerModule,MatNativeDateModule , MatIconModule, MatCardModule, MatSidenavModule,MatFormFieldModule,
- MatInputModule, MatTooltipModule, MatToolbarModule
- } from '@angular/material';
- import { MatRadioModule } from '@angular/material/radio';
- import { BrowserAnimationsModule } from '@angular/platform-browser/animations';
- import { AppRoutingModule } from './app-routing.module';
- import { AppComponent } from './app.component';
- import { EmployeeComponent } from './employee/employee.component';
- @NgModule({
- declarations: [
- AppComponent,
- EmployeeComponent
- ],
- imports: [
- BrowserModule,
- FormsModule,
- ReactiveFormsModule,
- HttpClientModule,
- BrowserAnimationsModule,
- MatButtonModule,
- MatMenuModule,
- MatDatepickerModule,
- MatNativeDateModule,
- MatIconModule,
- MatRadioModule,
- MatCardModule,
- MatSidenavModule,
- MatFormFieldModule,
- MatInputModule,
- MatTooltipModule,
- MatToolbarModule,
- AppRoutingModule
- ],
- providers: [HttpClientModule, EmployeeService,MatDatepickerModule],
- bootstrap: [AppComponent]
- })
- export class AppModule { }
Now, we have to import library in styles.css file.
- @import '@angular/material/prebuilt-themes/indigo-pink.css';
Step 8. Design HTML
Let;s design our html page now.
Open employee.component.html and write the below code.
- <div class="container">
- <mat-card>
- <mat-toolbar color="accent">
- <div align="center" style="color:white;text-align: right;">
- CRUD operation in Angular 7 using Web api and Sql Database
- </div>
- </mat-toolbar>
- <br><br>
- <mat-card-content>
- <form [formGroup]="employeeForm"(ngSubmit)="onFormSubmit(employeeForm.value)">
- <table>
- <tr>
- <td class="tbl1">
- <mat-form-field class="demo-full-width">
- <input formControlName="EmpName" matTooltip="Enter Employee Name" matInput placeholder="Employee Name">
- </mat-form-field>
- <mat-error>
- <span *ngIf="!employeeForm.get('EmpName').value && employeeForm.get('EmpName').touched"></span>
- </mat-error>
- </td>
- <td class="tbl1">
- <mat-form-field class="demo-full-width">
- <input matInput [matDatepicker]="picker"matTooltip="Enter Date Of Birth" formControlName="DateOfBirth"placeholder="Choose Date Of Birth">
- <mat-datepicker-toggle matSuffix [for]="picker"></mat-datepicker-toggle>
- <mat-datepicker #picker></mat-datepicker>
- </mat-form-field>
- <mat-error>
- <span *ngIf="!employeeForm.get('DateOfBirth').value && employeeForm.get('DateOfBirth').touched"></span>
- </mat-error>
- </td>
- <td class="tbl1">
- <mat-form-field class="demo-full-width">
- <input formControlName="EmailId" matTooltip="Enter EmailId" matInput placeholder="EmailId">
- </mat-form-field>
- <mat-error>
- <span *ngIf="!employeeForm.get('EmailId').value && employeeForm.get('EmailId').touched"></span>
- </mat-error>
- </td>
- </tr>
- <tr>
- <td class="tbl1">
- <span>Gender</span>
- <br><br>
- <mat-radio-group matTooltip="Enter Gender"formControlName="Gender">
- <mat-radio-button value="0">Male</mat-radio-button>
- <mat-radio-button value="1">Female</mat-radio-button>
- </mat-radio-group>
- <mat-error>
- <span *ngIf="!employeeForm.get('Gender').value && employeeForm.get('Gender').touched"></span>
- </mat-error>
- </td>
- <td class="tbl1">
- <mat-form-field class="demo-full-width">
- <input matTooltip="Enter Address"formControlName="Address" matInput placeholder="Address">
- </mat-form-field>
- <mat-error>
- <span *ngIf="!employeeForm.get('Address').value && employeeForm.get('Address').touched"></span>
- </mat-error>
- </td>
- <td class="tbl1">
- <mat-form-field class="demo-full-width">
- <input formControlName="PinCode" matTooltip="Enter Pine Code" matInput placeholder="PinCode">
- </mat-form-field>
- <mat-error>
- <span *ngIf="!employeeForm.get('PinCode').value && employeeForm.get('PinCode').touched"></span>
- </mat-error>
- </td>
- </tr>
- <tr>
- <td></td>
- <td class="content-center">
- <button type="submit" mat-raised-button color="accent"matTooltip="Click Submit Button"[disabled]="!employeeForm.valid">Submit</button>
- <button type="reset" mat-raised-button color="accent"matTooltip="Click Reset Button" (click)="resetForm()">Reset</button>
- </td>
- <td>
- <p *ngIf="dataSaved" style="color:rgb(0, 128, 0);font-size:20px;font-weight:bold" Class="success" align="left">
- {{massage}}
- </p>
- </td>
- </tr>
- </table>
- <br><br>
- <table class="table" >
- <tr ngclass="btn-primary">
- <th class="tbl2">Employee Name</th>
- <th class="tbl2">Date Of Birth</th>
- <th class="tbl2">Email Id</th>
- <th class="tbl2">Gender</th>
- <th class="tbl2">Address</th>
- <th class="tbl2">Pine Code</th>
- <th class="tbl2">Edit</th>
- <th class="tbl2">Delete</th>
- </tr>
- <tr *ngFor="let employee of allEmployees | async">
- <td class="tbl2">{{employee.EmpName}}</td>
- <td class="tbl2">{{employee.DateOfBirth | date }}</td>
- <td class="tbl2">{{employee.EmailId}}</td>
- <td class="tbl2">{{employee.Gender ==0? 'Male' : 'Female'}}</td>
- <td class="tbl2">{{employee.Address}}</td>
- <td class="tbl2">{{employee.PinCode}}</td>
- <td class="tbl2">
- <button type="button" class="btn btn-info"matTooltip="Click Edit Button"(click)="loadEmployeeToEdit(employee.EmpId)">Edit</button>
- </td>
- <td class="tbl2">
- <button type="button" class="btn btn-danger"matTooltip="Click Delete Button"(click)="deleteEmployee(employee.EmpId)">Delete</button>
- </td>
- </tr>
- </table>
- </form>
- </mat-card-content>
- </mat-card>
- </div>
Step 9
Open app.component.html and write the below code.
- <p>
- <app-employee></app-employee>
- </p>
Step 10
Open employee.component.ts file and write the below code.
- import { Component, OnInit } from '@angular/core';
- import { FormBuilder, Validators } from '@angular/forms';
- import { Observable } from 'rxjs';
- import { EmployeeService } from '../employee.service';
- import { Employee } from '../employee';
- @Component({
- selector: 'app-employee',
- templateUrl: './employee.component.html',
- styleUrls: ['./employee.component.css']
- })
- export class EmployeeComponent implements OnInit {
- dataSaved = false;
- employeeForm: any;
- allEmployees: Observable<Employee[]>;
- employeeIdUpdate = null;
- massage = null;
- constructor(private formbulider: FormBuilder, private employeeService:EmployeeService) { }
- ngOnInit() {
- this.employeeForm = this.formbulider.group({
- EmpName: ['', [Validators.required]],
- DateOfBirth: ['', [Validators.required]],
- EmailId: ['', [Validators.required]],
- Gender: ['', [Validators.required]],
- Address: ['', [Validators.required]],
- PinCode: ['', [Validators.required]],
- });
- this.loadAllEmployees();
- }
- loadAllEmployees() {
- this.allEmployees = this.employeeService.getAllEmployee();
- }
- onFormSubmit() {
- this.dataSaved = false;
- const employee = this.employeeForm.value;
- this.CreateEmployee(employee);
- this.employeeForm.reset();
- }
- loadEmployeeToEdit(employeeId: string) {
- this.employeeService.getEmployeeById(employeeId).subscribe(employee=> {
- this.massage = null;
- this.dataSaved = false;
- this.employeeIdUpdate = employee.EmpId;
- this.employeeForm.controls['EmpName'].setValue(employee.EmpName);
- this.employeeForm.controls['DateOfBirth'].setValue(employee.DateOfBirth);
- this.employeeForm.controls['EmailId'].setValue(employee.EmailId);
- this.employeeForm.controls['Gender'].setValue(employee.Gender);
- this.employeeForm.controls['Address'].setValue(employee.Address);
- this.employeeForm.controls['PinCode'].setValue(employee.PinCode);
- });
- }
- CreateEmployee(employee: Employee) {
- if (this.employeeIdUpdate == null) {
- this.employeeService.createEmployee(employee).subscribe(
- () => {
- this.dataSaved = true;
- this.massage = 'Record saved Successfully';
- this.loadAllEmployees();
- this.employeeIdUpdate = null;
- this.employeeForm.reset();
- }
- );
- } else {
- employee.EmpId = this.employeeIdUpdate;
- this.employeeService.updateEmployee(employee).subscribe(() => {
- this.dataSaved = true;
- this.massage = 'Record Updated Successfully';
- this.loadAllEmployees();
- this.employeeIdUpdate = null;
- this.employeeForm.reset();
- });
- }
- }
- deleteEmployee(employeeId: string) {
- if (confirm("Are you sure you want to delete this ?")) {
- this.employeeService.deleteEmployeeById(employeeId).subscribe(() => {
- this.dataSaved = true;
- this.massage = 'Record Deleted Succefully';
- this.loadAllEmployees();
- this.employeeIdUpdate = null;
- this.employeeForm.reset();
- });
- }
- }
- resetForm() {
- this.employeeForm.reset();
- this.massage = null;
- this.dataSaved = false;
- }
- }
Step 11. Run
We have completed all needed code functionality for our CRUD operations. Before running the application, first make sure save your work.
Now, let's run the app and see how it works.
Open TERMINAL and write the following command to run the program.
ng serve -o
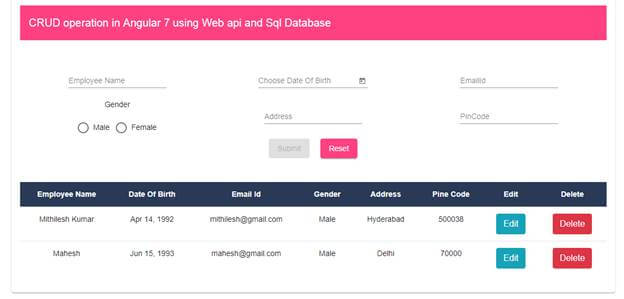
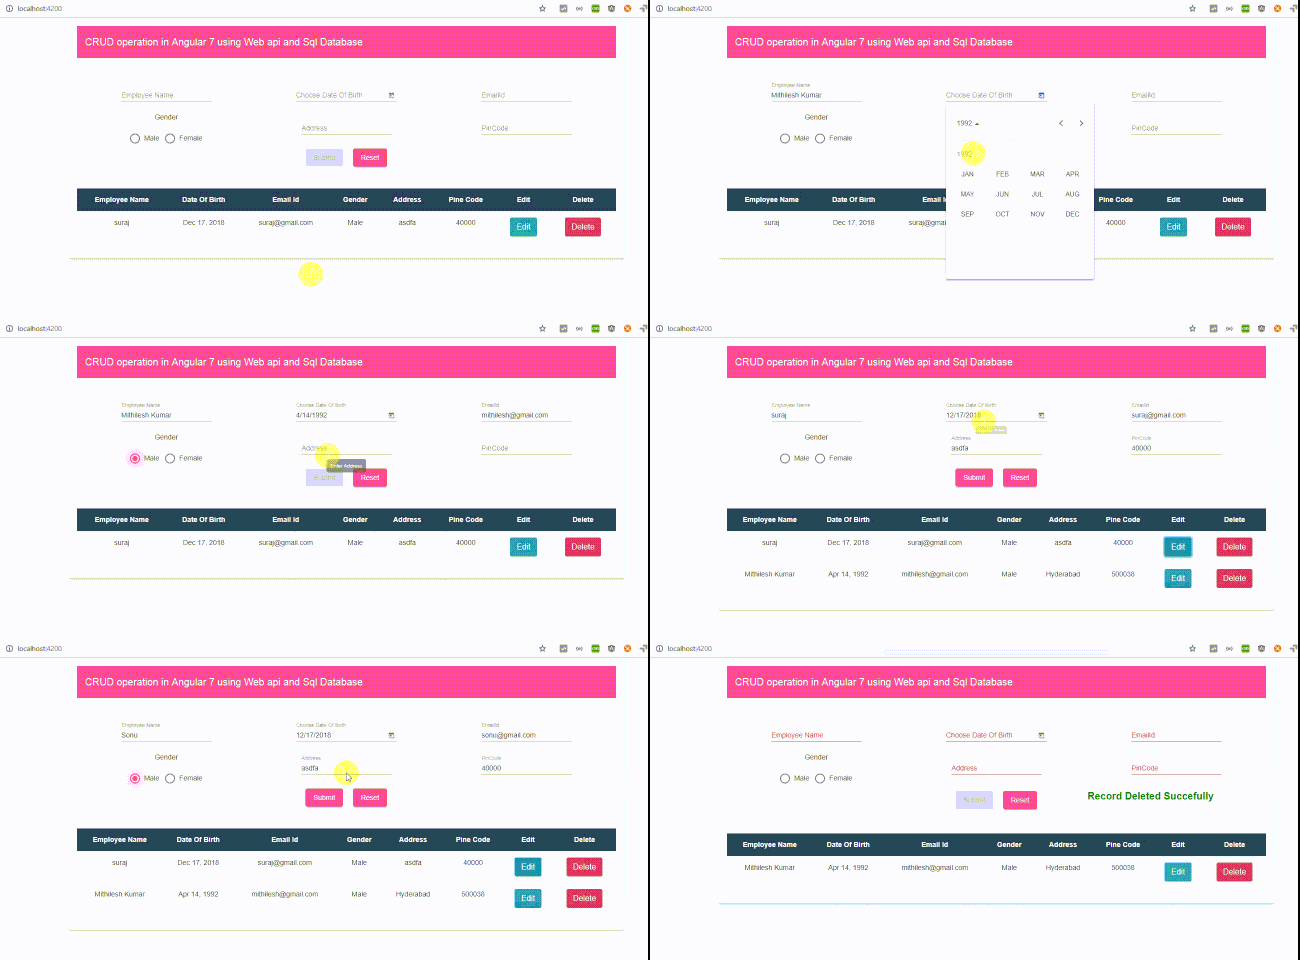
The output looks like the following image. It's a stunning UI created with CRUD operations.
Congratulations!
You've finished a completed Web app with CRUD functionality. The App uses a Web API to provide data access from a SQL Server.
Now, start playing with the app by adding, updating, and deleting data.
Thank you for reading my article.
- Get link
- X
- Other Apps
Comments
Post a Comment