Angular Architecture
- Get link
- X
- Other Apps
Angular Architecture is divided into different parts like Component, Template, Directive, Service, and Module.
Before you start to develop your application, you should have knowledge about the purpose of each part of the application. So that you can make your application smoother and faster.
Below is the figure of angular architecture.
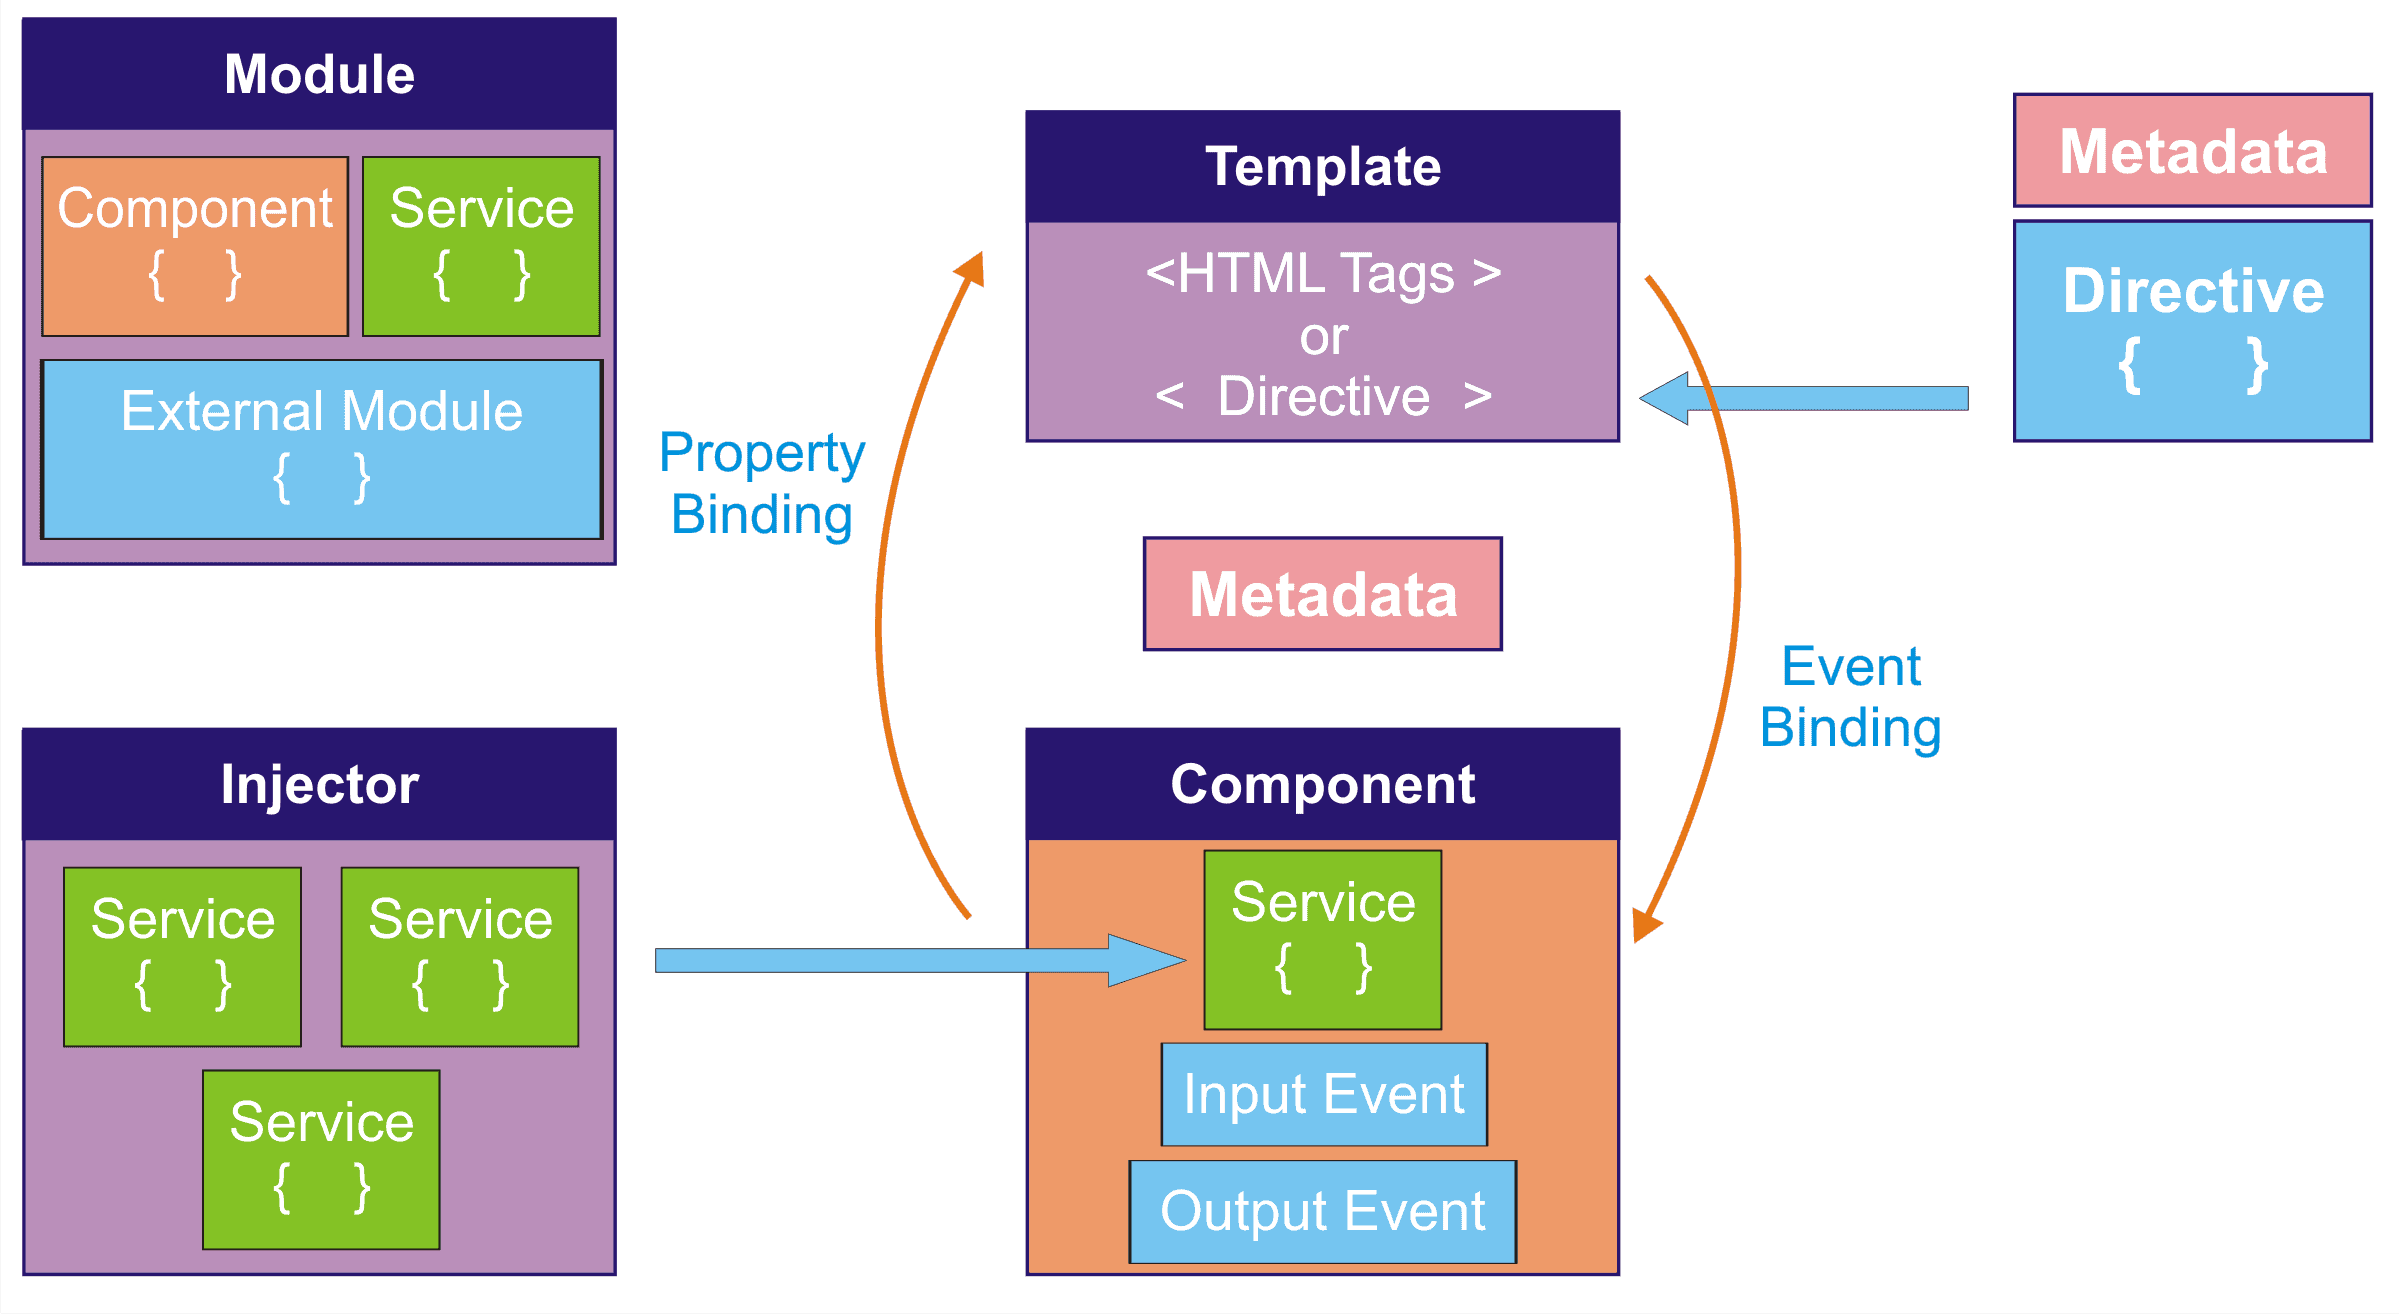
In this chapter, we will see each term in detail.
Angular Applications are modular and Angular has its own modularity system called NgModule.
Every Angular application has at least one class with a @NgModule decorator, it is the root module, conventionally named as AppModule.
To use any component into an application you need to declare it into the related module.
Angular Module is class with a @NgModule decorator.

The most important properties of @NgModule are :
declarations: declaration property contains a list of the component which you define for this module. As shown above, three components are declared.
exports: if you want to use component or directive of this module into another module then you need to add that component or directive name here. generally, root module or AppModule does not contain export property.
imports: if you want to use external modules(libraries) like FormsModule, RouterModule etc then you need to add that module name here. External module can be an inbuilt angular module or user-defined module.
providers: whatever service you create in that module you need to provide it here. The injector will get to know about the service from here.
bootstrap: you need to provide the name of the component which you want to load when the application loaded on the browser. Generally, it is the name of the root component. Furthermore, only root module contains this bootstrap property.
The component is the basic building block of User Interface(UI).
A component controls the path of the screen called a view. Each component is mapped to the template.

Angular Application is a tree of Angular Component.
For Example, As shown above, Root Component is loaded initially, and all other components like Header Component, Sidebar Component, and Page Component are child component of Root Component.Furthermore, Product Component is the child component of Page Component.
Angular component contains the properties, methods, constructor as well as input events, output events and lifecycle methods like ngOnInit, ngOnDestroy etc.
Angular creates, updates and destroys components as the user moves through the application.
Code Snippet of AppComponent is shown below.

This code snippet contains one
title
property,
langs
array. One lifecycle method
ngOnInit
is used which is called whenever this component is loaded. Furthermore, one
addLanguage()
method is created to add language in
langs
array.As you can see, you need to give@Componentdecorator to the typescript class to use it as a component.
Important properties of the @Component decorator :
selector: the name given in this property is used on HTML page as a tag to load that component the screen. For example, to load app-root on screen you need to use
<app-root>
on HTML page.
templateUrl: templateUrl is used to map an external HTML page to that component. As shown above, the
app.component.html
page is mapped with AppComponent.
template: if your HTML content(view) is small than instead of writing external HTML page, you can directly use HTML in this property.
styleUrls: styleUrls is used to insert the list of CSS files which you want to use for that component. As shown above, the
app.component.css
file contains the style of AppComponent.
styles: this property can be used to write internal styles for that component, instead of writing in another external file.
As we have seen in Component, each component is mapped to one template.
A template is a form of HTML that tells Angular how to render the component on the screen.

As shown above, A template looks like a regular HTML, except for a few differences, like directives, events, interpolation, data binding, other component tags.
Code like *ngFor, {{user.userName}}, (click), [product], and uses Angular’s template syntax.
Template is a tree like structure as you can see below

Angular supports the data binding for coordinating parts of a template with the parts of a component.

Angular supports following types of data binding :
Interpolation: Interpolation is used to view component property value on the screen. As shown in template code snippet. There is
{{title}}
is used to display title property value of component on the screen.
Property Binding: Property Binding is used to update DOM property as well as for the input events. For example
[class]
is used to update DOM style class of that element.
Event Binding: Event Binding is used to generate an event from a specific element like, on Button click or on keyup event of input control etc. As shown in template code snippet, there is
(click)='addLanguage(Language.value)'
event binding on the button control. Here once you click on the button,
addLanguage()
handler is called to handle that event.
Two-way Data Binding: Two-way Binding is mostly used when you work with template-driven forms. in this data binding component property is mapped to the template control. As a result, whenever you update the value on screen, it will be automatically updated in component and vice versa. The syntax of two-way data binding is
[(ngModel)]='property'
.
Generally, All the parts of angular like component, directive, module or service, all are basic typescript classes. but,
the question is How angular know type of class?
The answer to the above question is Metadata.
Metadata tells Angular how to process a class.
In typescript, you attach metadata by using @Component, @NgModule, @Injectable or @Directive


Angular Templates are dynamic. When Angular renders them, it transforms the DOM according to the instructions given by the directives.
A Directive is a class with a @Direcitve decorator.

Angular provides two types of directives :
Structural Directive: Structural directives change the structure of DOM template. For example,
*ngFor
,
*ngSwitch
,
*ngIf
etc are structural directives.
Attribute Directive: Attribute directive updates the attribute of specific HTML control for example
[ngClass]
is an attribute directive.
A component is a directive-with-a-template; a
@Component
decorator is actually a
@Directive
decorator extended with template-oriented features.
Services are used for reusable data services to share between components throughout an application.
As shown below
@Injectable()
decorator is used to declare any typescript class as Service.
This is mainly used for Server side web service call.
This can be also used as data sharing class, to share data between components throughout an application as well as writing business logic.
Services are invariable asynchronous. We can return data as a promise or an Observable using RxJS.

Above shown above, Service code snippet contains one
addUser()
method and one
getUsers()
method which uses the HTTP get web service call.
Dependency Injection is a way to supply a new instance of a class with the fully-formed dependencies it requires.
Most dependencies are services.

In above example, UserComponent depends on UserService.
Angular uses dependency injection to provide new components with the services they need.
Injector maintains the list of Services which you are going to use in the application. Whenever any component requires the service, injector will give the instance to that component.
- Get link
- X
- Other Apps
Keep posting important points
ReplyDeleteThe block for the angular architecture is explained very well.
ReplyDelete